
This chicken tractor (plans to follow) was years in the making. I perused several books, searched the internet high and low and consulted with my father-in-law. The final result is simple and elegant. The thing that makes it elegant is that it is light and easy to manage.
My six year old son can move it easily, feed and water them for the day with just one visit. Being based on electrical conduit was my father-in-law's idea and the cornerstone of this tractor. Electrical conduit -also called EMT (Electrical Metallic Tubing)- is inexpensive. This chicken tractor uses 1/2" EMT and cost us around $100. EMT is galvanized and should last for upwards of ten years in the caustic chicken raising environment. People have asked me why I don't use PVC pipe. It won't hold up in the direct sun, it is heavier and isn't as strong as EMT. I also considered pressure treated wood but rejected it because it is treated with poison and chickens will try to eat anything. I don't want to eat pressure treated wood even once removed.
The dimensions of our chicken tractor are 8' by 10' by 2' high. These dimensions are to optimize the materials--EMT comes in 10' lengths. Normal chicken wire comes in 4' widths and hardware wire mesh comes 2' wide. This size also fits through our farm gates and maneuvers through our small paddocks easily. People have made narrower versions of this tractor with great success.
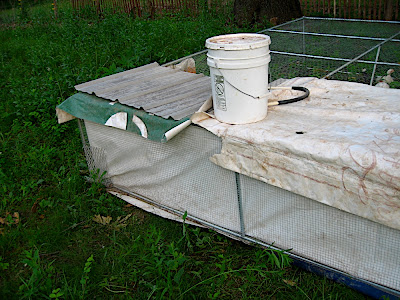
Some of what our tractor is made from is found materials; I collect stuff. We live fairly near an attraction that supports plenty of billboards. Billboard tarp is a godsend. We use it everywhere and it is almost free. Chickens need shelter from the hot sun and rain. Billboard tarp is our answer. You'll need to find a similar solution. Lumberyards usually have surplus lumber tarp.
The poultry fountain and feeder are both items that I spent a lot of effort optimizing. I built the hopper-style feeder from found parts. That is a topic for another day. The poultry fountain is commercially available but needs simple plumbing to make it really useful for an uneven terrain chicken tractor.
The tractor parts list
- 13 pieces of 1/2" electrical conduit EMT
- 8 pull able 90°s for the 1/2" EMT
- 100' of 12 to 16 gauge galvanized steel wire.
- 37' of 1/2" squares hardware wire cloth
- 21' of 48" wide standard chicken wire (the smaller holes)
- 30" length of steel roofing 30" by 3'
- 98" length of 1" EMT the axle bushing
- 2 wheels with axle extending one foot out one side of each wheel
- a handful of 1-1/2" self tapping metal screws I like the kind that have a 5/16 nut driver head.
- tarp UV stable 5' by 8' or larger. has to be a rip stop type of material.
tools list
- flat head screw driver
- hack saw
- linesman pliers
- variable speed electric drill
- drill bit sized to pre-drill for the outside diameter of your metal screws. just a little bigger than your screws.
- magnetic 5/16" nut driver bit to fit your drill
- 1/2" EMT pipe bender
- six year old helper optional
The concept of this tractor is to be flexible and light weight. It needs to follow the contour of the terrain. That is why 1/2" EMT is better than any larger size.
The first step is to take apart the EMT 90°s. Save all the plates and screws, you'll need them later. This is a good job for a six year old. Then, drill out a hole in the exact center of each removed plate from the 90°s.
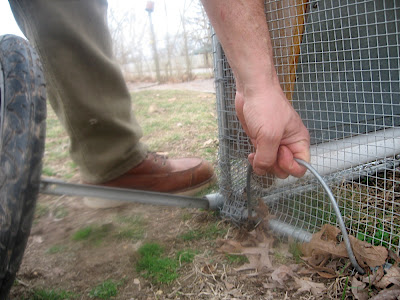
Cut eight of your ten foot lengths of EMT, two feet off each one. You should end up with eight 2' pieces and eight 8' pieces of EMT. Assemble two rectangles 8' by 10' using the EMT and pullable 90°s. This is also a good job for a 6 year old. Hand tighten each corner firmly--you'd better double check your helper.

Especially since he was only five in this photo.
Mark four of your 2' pieces of EMT in the exact same spot at both ends. You can do this by holding the EMT firmly on a flat surface and marking the top. This step helps keep things lined up. Attach one removed plate to each end of all four pieces of 2' EMT (the corners). They should be 1/2" away from the ends. The self tapping screw can drill right through the EMT without pre-drilling. I put the little escutcheon of the plate facing the head of the screw. Just make them all look the same.

Reassemble the plates (corners) to the 90°s this forms the box shape of the tractor. Five gallon buckets are helpful to keep the other three corners off the ground when first starting.

Cut one inch off the four remaining 2' pieces of EMT (the side supports are 23" long). Make four more side support pieces from the remaining 10' piece of EMT.
Let the drilling begin. Mark and drill holes on every end of each piece of remaining EMT minus one of the 8' pieces. these must all be drilled on the same plane so be sure to use the marking method described earlier. The holes should be large enough that a piece of your 12 gauge galvanized wire fits easily through. Pieces to be drilled should include:
- one 10' piece
- three 8' pieces
- eight 23" pieces
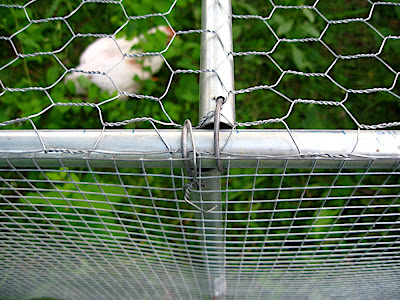
The center needs a support in case any kids or dogs decide to climb on top of it. I bent the remaining piece of eight foot EMT 90° and held it to an edge and cut the tails off. The tails make good handles. Then I wired it to the center support like a swing using the wiring method above. When the tractor is moved it slips around obstacles and rights itself at final resting place to act as support (see second photo below).
Wind protection
Cut the tarp into strips 2x(8' by 30") or one long strip 16' by 30". Choose an end of the coop to have the door and all the heavy stuff. Wrap this end with the tarp leaving the extra width on the bottom to act as a skirt when moving it. The wind break/skirt should cover the entire door end and wrap evenly along the sides. Wire this in several places to the top and bottom. Slightly thinner gauge wire can be used for the tarp covering if you have it.
Hardwire
Wire the hardwire/hardware cloth to the perimeter, overlapping any joints. Wire this securely every foot or so and doubly at the corners. This is your main defense so don't cut any corners here because regular chicken wire won't defend against raccoons.

The top
Stretch and cut the chicken wire to the top. Leave a rectangle on the door end open for the door. Wrap a little extra length around the EMT at the perimeter ends and door. The wire should join at the center cross support. Wire it together and to the 10' cross support frequently--every 6 to 10 inches.
The door

I use a piece of steel roofing material for the door. Hinges are made of wire.
The door, feeder and water should all be on one end--the heavy end. I have a set of small wheels with axles from a kids bicycle trailer. I wired a piece of one inch conduit in such a way to receive the wheels.
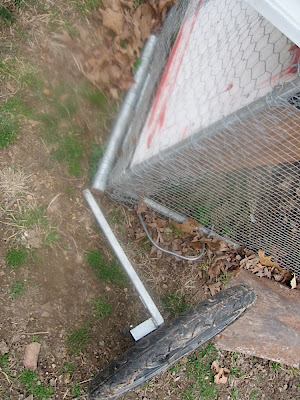
I lift each corner by wire handles and slip the wheels on.
If you don't have extremely heavy gauge wire for handles you can thread a stub of EMT less than 12 inches long. This photo shows a threaded bent handle at the move-around end.

Once the wheels are on the entire thing moves around like a wheelbarrow. The chickens follow along and are happy to dig-in to the newly exposed area. It is amazingly light, anyone can move it, even a six year old. This feature is surprisingly important since during the last few weeks of occupancy it is best if you move them twice per day. I find that if I have to muster my courage to attempt farm chores they easily slip to the back burner until just shy of too late. We raise twenty five broilers twice per year per chicken tractor--we have two of them.
The wonders, benefits and sustainability of chicken tractors are the subject of a few books. Here are a couple of them.
Pastured Poultry
Chicken Tractor: The Permaculture Guide to Happy Hens and Healthy Soil

32 comments:
Yes, pictures! Always pictures! Do the children fit in it?
Cool pictures, I like the design a lot. Looks very nice and lightweight. I've got to find me some billboard tarp one of these days. :)
Ron
Do you find that having the wheels on the end leaves room for critters to get in or out of the tractor? Or is the diameter of the wheel small enough that the axle is low to the ground? If that makes sense..
northwoods, the wheels are only on the tractor when moving it. if that answers your question.
Hi Karl,
Thanks for the detailed plans! I will be building a couple of these. I will size mine to just fit in my garden beds. I plan to use my birds to fertilized the beds and scratch them up for me. Any thoughts on this? We do not have enough open space to move them daily.
mother of blessings, i plan to build a smaller one to use exactly like you suggest. i imagine it will work very well. we need areas in our garden cleaned and rid of bugs. if it works i'll publish my findings here.
There's a video about just this on Garden Girl TV (youtube), if you guys want to check it out. She builds hers out of wood, but is doing exactly the same thing afa putting it in her garden.
PS, we're loving ours so far! Haven't lost a poult since we put them in.
Karl,
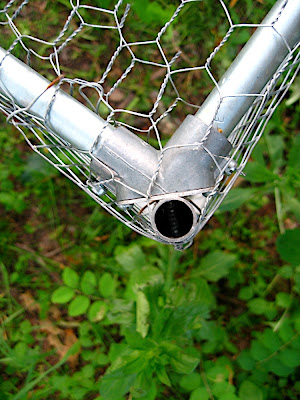
I enjoy your site and really like your design. We live in the NC foothills where the land is very hilly too and I would like to give this a try. I was wondering about the detail picture of the corner. What is that between the 2' section and the screws in the pullable corner? It looks like it is wired on, but I can't quite make out what it is.
Thanks!
if i know what you are referring to it is a piece of heavy gauge wire as a handle for picking it up.
if you are talking about the other end where you pick it up to wheel it around? that is a just a piece of emt bent as a handle.
i hope that helps.
my wife thought that maybe you were talking about the hopper style feeder that i built? i have yet to perfect it. so i haven't exclaimed it done and worthy of a how-to post.
Sorry, Karl, that's not what I'm looking at. The second photo in the post is looking down on a top corner of the tractor. Right down where the 2' EMT section connects to the 90 degree EMT corner. I see the screw coming through the EMT and I see the screw heads holding the cover on the "pull able" 90 degree coupling. Between each of those screw heads and the 2' EMT (on both sides of the conduit) is something. I don't see it in the photo where your son is assembling the corner. That's the first pic after the parts list. It's no big deal I just can't figure it out... which drives me nuts. Thanks!
oh that is the corner. each pull-able 90° has a removable plate. in that photo you are seeing a screw coming through the plate from the inside of the 90°. the plate must be removed then attached to the 2' section of emt then re-attached to the die-cast portion of the 90° with the provided factory bolts.
i hope this explains it. if not, get one of those pull-able 90°s. take it apart and it should make sense.
I'm finally getting around to building one of these. You may want to update your materials list. Your instructions take fourteen 10' sections of EMT to complete the pen (not 13). I don't see as many 23" support sections in your pictures as you describe. Perhaps they made up the extra piece. Anyway, it's coming along. I never did figure out what's on that corner in the picture, but I can live with that mystery. I hope you're all well and thanks for posting this great idea. I'll try to let you know how mine works out.
reviewed your plans a couple of times and also had a question about the "pullable" corners. After careful study of the pictures it dawned on me that there is a long screw coming from inside of the pen to the outside which holds the verticle emt to the "pullable" corner. Am I correct on that? Enjoyed your web page. Cool family.
I know what your asking about the corners. It's the little rubber looking things wedged between the pole and the plate. I was trying tofigire what it was as well.
Thank you for this plan were using it as a coop run. Crystal
Nice work and resource. Just wondering how many mature birds this will hold comfortably?
Would it be possible for you to post a better photo of the door portion of this guide? It would help me greatly
I built this tractor pretty much like you with some very minor changes. I have 29 chickens in mine right now and they are 4 weeks old. They are extremely untame. How do you get yours old for slaughter? I dont want to chase them on my hands and knees and wonder if I could catch them if I raise the tractor up and let them out. Any ideas?
Jason, We used wooden picket style snow fence and surround tractor. The snow fence stands up by itself. Then we tip up the tractor on it's end. The chickens are contained but accessible by people. By people I mean children since that was one of our kids jobs during butcher.
I am building this tractor, but having a problem. I connected the 2' sections to the plates and reattached the plates to the elbows. I have all four corners attached top and bottom, but the thing keeps falling over because the 2' section and the plate are rotating on the screw. Anyone else have this problem and find a way to overcome it?
I am building this tractor, but having a problem. I connected the 2' sections to the plates and reattached the plates to the elbows. I have all four corners attached top and bottom, but the thing keeps falling over because the 2' section and the plate are rotating on the screw. Anyone else have this problem and find a way to overcome it?
leenie,
once the hardware cloth is on it will stop falling over. until then tighten your screws. i use a nut driver to get more leverage.
http://www.amazon.com/TEKTON-2928-14-Piece-Power-Driver/dp/B000NPXHUM/ref=sr_1_2?s=hi&ie=UTF8&qid=1350902102&sr=1-2&keywords=nut+driver
I just built one of these and it seems to be a good design. My only major feedback is that if you have access to a cheap welder and even very basic welding skills (since the forces involved are so minimal) you could save a lot of time twisting wire to attach hardware cloth, and avoid buying the pullable 90s altogether. Just weld 2 8x10 squares, then screw the 2' lengths to the insides of the corners (you could even weld that joint, but you sacrifice the adaptability to the terrain, which is a major design point. Another advantage of welds is there are fewer sharp spurs. Good design though.
anon-
I have never owned a welder. I now have one at work that I use quite often. I see your point but this design is meant for your average backyard farmer. Also, welding is so permanent. tweaking a design is impossible except by starting over.
A welder causes other issues besides the need to have one. The places where you weld it will begin to rust the very first year. yeah a little paint but then you are back to a similar amount of effort as simply twisting some wire.
good luck with your tractor...
Can you please fix the picture of the door, it doesn't show up. I'm curious to see how it looks. Thanks!
You have a pipe bender on your tools list, but I don't see it used anywhere. What's it for?
I am just staring to research raising broilers. We have had layers for years. My question is after they are 3 weeks old and able to be out do you just leave them in the trailer or do you bring them in at night so they can have access to a light source?
it depends on the night time temps. in early spring we would put a heat lamp in the tractor via an extension cord.
Karl,
Please take more close-up pics of the 90 - particularly on how you attached that all. The pics you currently have do not fully disclose what was done.
I see a screw through it from the inside corner of the 90, but the lack of detail in the image doesn't let me realize how to make that connection.
thanks
How do you use a nut driver to tighten the screws on the Pull Elbows when the nut is inside the assembly? I have the frame together and the 10' support lashed across the middle with all 3 8' cross beams lashed as well. I put 4 of the 23" from top to bottom in the middle of each of the 4 sides. It is VERY wobbly and I feel as though I have missed something. I have 4 23" poles with holes in them left and still need to apply the hardware cloth to the sides. I want it to be stable when there are chickens in it and we are moving it on the pasture.
I read your comment that the hardware cloth will stabilize the unit a little, but does it keep it square? Will the unit bend over time if that is the case? I am not sure if you are still reading comments on this post, but I will look forward to any assistance you may offer.
Jerry
Jerry,
The hardware cloth stabilizes the entire frame. the self tapper screws should be fairly tight to begin with but depend on the hardware cloth to stabilize.
Post a Comment